Open Tofu, the open source fork of Terraform™ became generally available last month. I wanted to create a project using Tofu to try it out and see if there were any issues or differences compared to Terraform.
I had a couple of things in mind doing this. Aside from trying Open Tofu for the first time I wanted to make sure Tofu could:
The quick answer is that all 3 continue to work with Tofu. I didn’t experience a single issue.
I’m working a lot with Flink right now and enjoying it, so I created a Tofu version of a Flink cluster on AWS: https://github.com/gordonmurray/tofu_aws_apache_flink
To start off, Packer is used to create an AMI. It is a base instance with Java, Flink and some JARs installed.
Tofu can then use the resulting AMI to create one or more EC2 instancess. For the Flink Job Manager I used a standard aws_instance
resource. For the Task Managers I used aws_launch_template
launch templates. I used lauch templates instead of directly creating EC2 instances so that any failing Task Manager would be replaced automatically from the base image. Any workloads running on Flink could continue to work uninterupted.
I could use the same approach of using templates for the Job Managers too. That would involve running 2 or 3 Job Managers and so Zookeeper needs to get involved to hold things together. I might add that to the repo in the near future.
Using a launch template opens up the opportunity to use Spot instances. Those are EC2 instances that are lower cost to run. They are lower cost but can disappear at any time. This is where the launch template comes in, it will replace any instance that disappears.
I created 2 independent launch templates and 2 auto scaling groups. Both use spot instances but both have different instance types defined, an m7g.large and an m7g.xlarge. This can help to make sure that at least 1 type of instance is running if the other is unavailable as a Spot instance. It also allows both groups to be scaled up or down independently. One group might better handle sourcing data from Kafka for example and the other might be better suited to sinking data to an s3 bucket.
While using spot instances helps to keep the cost down, it also provides an opportunity to use a larger instance type than one might ordinarily consider using due to being too expensive. Flink loves to use more memory!
User data is a way to run some commands on an EC2 instance when it starts up. Tofu applies the user data to update the Flink config on a task manager as it starts up, such as setting the Job Manager IP address so that a new Task Manager can join the cluster.
With a Flink cluster up and running the next step is to give it some work to do. Flink can take in work in the form of Java applications compiled as JARs and also in the form of SQL using Flink SQL. I used the Ansible provider for Terraform to get Tofu to call an Ansible playbook to submit Flink SQL work to the cluster.
Using an Ansible provider to submit work to Flink might be an unusual step though it has advantages. Details of resources created by Tofu such as a database, cache or S3 bucket can be passed to Ansible as variables. Ansible can use that information in its Flink SQL jobs.
The Job to submit to Flink is in the form of an Ansible role. A task reads in a template file that contains the Flink SQL and can perform any interpolation needed such as Kafka broker addresses, registry addresses, sink addresses and so on. The directory structure is as follows. More Roles can be added over time to add more work to the Flink cluster
flink_jobs
├── tasks
│ └── main.yml
└── templates
└── queries.sql.j2
3 directories, 2 files
Overall, Tofu worked well out of the box. If felt faster to apply changes compared to Terraform though that’s probably since its a small project.
Some improvements to this project could include:
The main questions I had in mind for this were (a) if I could get it to work and (b) would it exclude the field(s) in both the initial snapshot phase (whereby all existing data in a table is copied) or in the ongoing CDC phase (whereby ongoing changes are copied) that Debezium performs, or both.
The good news is that I got it working well and that a field is excluded in both the snapshot and the ongoing CDC phase, which is great. I was worried it might might only work in one of those phases.
I lost some time down a rabbit hole at the start. I had read somewhere that the field to use in the connector to exlude a field was column.blacklist
and no matter what values I used in this, I couldn’t get it to work. After some Googling I found that it had been renamed to column.exclude.list
.
I created a project on Github with the files. It uses Docker Compose to create a mariadb instance, populate it with some sample data and then a connector config to CDC from a table in to Kafka, with some fields to be excluded.
The sample data I used is a users table with some generated data:
CREATE TABLE users (
id INT AUTO_INCREMENT PRIMARY KEY,
first_name VARCHAR(50),
surname VARCHAR(50),
email VARCHAR(100),
date_of_birth DATE,
signed_up DATETIME,
user_type ENUM('user', 'admin')
);
INSERT INTO users (first_name, surname, email, date_of_birth, signed_up, user_type) VALUES
('John', 'Doe', 'john.doe@example.com', '1990-01-01', '2022-01-15 08:30:00', 'user'),
('Jane', 'Smith', 'jane.smith@example.com', '1985-05-20', '2022-02-10 09:45:00', 'admin'),
('Alice', 'Johnson', 'alice.johnson@example.com', '1992-07-11', '2022-03-05 10:00:00', 'user'),
('Bob', 'Brown', 'bob.brown@example.com', '1988-09-30', '2022-04-20 11:20:00', 'user'),
('Charlie', 'Davis', 'charlie.davis@example.com', '1995-11-15', '2022-05-25 13:45:00', 'admin');
I then created a connector for Debezium that included the following values to exclude the surname, email and date of birth fields from being copied to kafka.
"column.exclude.list": "mydatabase.users.surname, mydatabase.users.email, mydatabase.users.date_of_birth",
Once I started the connector, I was able to query the messages in the resulting topic to see if the fields were present.
➜ ~ ./kafka/bin/kafka-console-consumer.sh --bootstrap-server localhost:9092 --topic testing.mydatabase.users --from-beginning | jq
One of the records now looks like the following example. Not much left after the sensitivie fields have been removed, but its working well.
"payload": {
"id": 5,
"first_name": "Charlie",
"signed_up": 1653486300000,
"user_type": "admin"
}
To test the CDC part, I added and updated a record or two in the source database, to see what the data might look like:
INSERT INTO users (first_name, surname, email, date_of_birth, signed_up, user_type) VALUES
('Bobby', 'Tables', 'bobby.tables@example.com', '1995-07-01', '2023-03-15 08:30:00', 'user');
update users set email = 'bobby.tables.new@example.com' where first_name = 'Bobby' and surname = 'Tables';
The topic content was still good, no sign of the sensitive fields being carried over:
"payload": {
"id": 6,
"first_name": "Bobby",
"signed_up": 1678869000000,
"user_type": "user"
}
So it works well. A 1-line change in a source connector can remove any unwanted or sensitive fields, so theres no excuse for sensitive data getting in to your Datalake!
The files are available on https://github.com/gordonmurray/debezium_exclude_columns
]]>I created a small project to source data from a relational database using Debezium to populate some kafka topics and then added the HTTP connector to send data from one of the topics to a HTTP endpoint.
It works well and had a couple of pleasant surprises such as the connector auto creates topics in the kafka cluster to store a record of errors and successes of the HTTP calls. That’s great for debugging and delivery issues. You can control the topic names in the connector config too.
I created a docker compose file that creates a Mariadb Database with a tiny products table and a Debezium container. The first connector is added to source the data from the database and populate kafka topics. The second connector is the HTTP connector, to send events form one of the topics to a HTTP endpoint.
I used Warpstream as my kafka cluster and I used Ngrok as a temporary endpoint to send data to so I could inspect the data that is received.
The source connector to read data from a table in the database is located at files/connector_mariadb.json looks like the following, it is a minimal connector, no serialization of the data:
{
"connector.class": "io.debezium.connector.mysql.MySqlConnector",
"database.history.kafka.bootstrap.servers": "api-xxxxxxxxxx.warpstream.com:9092",
"database.history.kafka.topic": "history",
"database.hostname": "mariadb",
"database.password": "rootpassword",
"database.port": "3306",
"database.server.id": "12",
"database.server.name": "myconnector",
"database.user": "root",
"database.whitelist": "mydatabase",
"schema.history.internal.kafka.bootstrap.servers": "api-xxxxxxxxxx.warpstream.com:9092",
"schema.history.internal.kafka.topic": "schema-changes.mydatabase",
"table.whitelist": "mydatabase.products",
"tasks.max": "1",
"topic.prefix": "testing",
"transforms.unwrap.type": "io.debezium.transforms.ExtractNewRecordState",
"transforms": "unwrap"
}
The fields to pay attention to in the JSON config are:
database.history.kafka.bootstrap.servers
& schema.history.internal.kafka.bootstrap.servers
- your kafka brokers, in my case Im using WarpStreamdatabase.*
fields - to specify the connection details to the databasetable.whitelist
- the table you want to pull data from, written in the format of schema.tablenameDebezium will create a number of topics in the kafka cluster, in this case it will create a topic called testing.mydatabase.products bases on the prefix and table.whitelist contents.
Once the topic is in place with some records, I can then add the HTTP sink connector, located at files/connector_http.json. The connector config looks like the following:
{
"connector.class": "io.confluent.connect.http.HttpSinkConnector",
"tasks.max": "1",
"topics": "testing.mydatabase.products",
"http.api.url": "https://xxxxxxxxxx.ngrok-free.app",
"request.method": "POST",
"headers": "Content-Type:application/json",
"batch.size": "3",
"max.retries": "3",
"retry.backoff.ms": "3000",
"connection.timeout.ms": "2000",
"request.timeout.ms": "5000",
"confluent.topic.bootstrap.servers": "api-xxxxxxxxxx.warpstream.com:9092",
"reporter.bootstrap.servers": "api-xxxxxxxxxx.warpstream.com:9092",
"reporter.error.topic.name": "error-topic",
"reporter.error.topic.replication.factor": "1",
"reporter.result.topic.name": "success-topic",
"reporter.result.topic.replication.factor": "1"
}
The fields to pay attention to in the JSON config are:
topics
- thats the topic in kafka you want to respond to, in my case its ‘products’http.api.url
- thats the URL to send the events to, in my case is an ngrok endpoint for testingconfluent.topic.bootstrap.servers
& reporter.bootstrap.servers
- your kafka brokers, in my case Im using WarpStreamFor an API endpoint I used ngrok, I started it locally using the following command and it gave me a URL to add to my HTTP connector
ngrok http 80
Once the connectors are updated with any changes you want to make you can start the containers.
Run docker-compose up -d
and connect to the Debezium container:
docker exec -it debezium /bin/bash
Docker compose will upload the connectors in to the Debezium container, you can start the connectors using to following commands:
Create the source connector:
curl -X PUT http://localhost:8083/connectors/my_database/config -H "Content-Type: application/json" -d @connector_mariadb.json
Give it a moment to create the topics and then create the HTTP sink connector:
curl -X PUT http://localhost:8083/connectors/http/config -H "Content-Type: application/json" -d @connector_http.json
You should see at least 3 calls to the API endpoint, one for each of the 3 records thats in the database by default. Adding or updating records in the table will trigger more calls to the endpoint.
The events look like the following in Ngrok
Struct{id=3,name=Product C,price=39.99}
It doesn’t trigger a HTTP event for any schema changes, but any events after a schema change will contain the data for any new columns that are added. I added a notes column and the data appeared in the next HTTP call without any changes.
Struct{id=5,name=product E,price=33.00,notes=great product}
Schema changes are recorded in another topic called schema-changes.mydatabase so another HTTP sink could be used to monitor that topic if you wanted to watch for schema changes.
Overall a quick and successful test, Ill be able to use this connector in future to send content form topics off to API endpoints, handy for keeping systems in sync.
The files I used for this are available here in Github: https://github.com/gordonmurray/debezium_warpstream_http_sink
]]>To verfiy the results produced by the Flink jobs were OK, I was able to query the source database and the destination Redis instance that Flink sends its results to. As things scale up though it isn’t practial for me to query the database and redis for every customer thats processed.
There is a feature of Vector.dev I read about in the past and wanted to try out, the ability to convert logs to metrics that Prometheus could scrape. I wasn’t sure how this would work but I took some time to try it out. Im glad I spent the time on it, it gives me a clear visual in a Grafana dashboard showing me the results are progressing or are fully ok.
I wrote a bash script that could query the source database and destination redis periodically for a number of customers and write a brief log line each time. Ideally the source and destination count would be the same resulting in a differecnce of 0 and a “Pass”. If the counts were different it would log the difference and label it as a “Fail”.
The Pass and Fail are mainly there for me to see at a glance, they are not needed for the process to work. The logs look something like the following:
datetime, customerID, source count, destination count, difference, pass/fail
2023-12-18 09:33:22, 12345, 1000, 1000, 0, PASS
2023-12-18 10:33:12, 67890, 500, 200, 300, FAIL
The bash script runs every so often and appends results to the log file each time.
This is where Vector.dev comes in. Vector contains a config file that defines a source, a transformation and a destination. In my case I had a log file as a source and Prometheus metrics as a destination. Vector Remap Language (VRL) is used to define the transformation to apply to the log lines.
The full config file for Vector looks like this:
# A source section pointing to my results log file
[sources.my_source]
type = "file"
include = ["/path/to/results.csv"]
# A transformation written using VRL to parse the log lines
[transforms.parse_logs]
type = "remap"
inputs = ["my_source"]
source = '''
parsed = parse_csv!(.message)
.log_timestamp = parsed[0]
.customer = parsed[1]
.source_count = parsed[2]
.destination_count = parsed[3]
.difference = to_int!(parsed[4])
'''
# structure the output
[transforms.to_metrics]
type = "log_to_metric"
inputs = ["parse_logs"]
metrics = [
{ type = "gauge", field = "difference", tags = { "customer" = "" }, name = "log_difference" }
]
# A sink to expose the transformed data for Prometheus
[sinks.prometheus]
type = "prometheus_exporter"
inputs = ["to_metrics"]
address = "0.0.0.0:9598" # Prometheus scrape URL
When Vector starts up, it exposes an endpoint at http://localhost:9598 that Prometheus can scrape.
The output produced by vector looks something like the following, with a lable for each customer, the resulting difference and a timestamp.
log_difference{customer="12345"} 0 1703793649000
log_difference{customer="67890"} 300 1703793649000
A quick update to Prometheus to make it aware of the new endpoint using the port 9598:
scrape_configs:
- job_name: 'custom_metrics'
static_configs:
- targets: ['xxx.xxx.xxx.xxx:9598']
I was then able to create a new Visualization in a Grafana dashboard alonside other Flink info. The following image shows the data is way off in the beginning and becomes consistent ( source and destination = 0 ) as the Flink job completes processing the data.
Having this visualization has been a great addition. I can see the numbers go out of sync at times when Flink is processing large amounts of new data coming in from Kafka and then it syncs up again.
]]>However if you have a large volume of logs or if you hope to retain the logs for a long time, the costs can add up quickly.
Using a combination of Vector.dev (a logging agent), Warpstream (a kafka compatible data streaming platform) and Apache Flink (a distributed processing engine) can provide a hugely cost effective and powerful logging solution worth looking at.
Using some generated access log data we can create a working example of these tools working together to try it out.
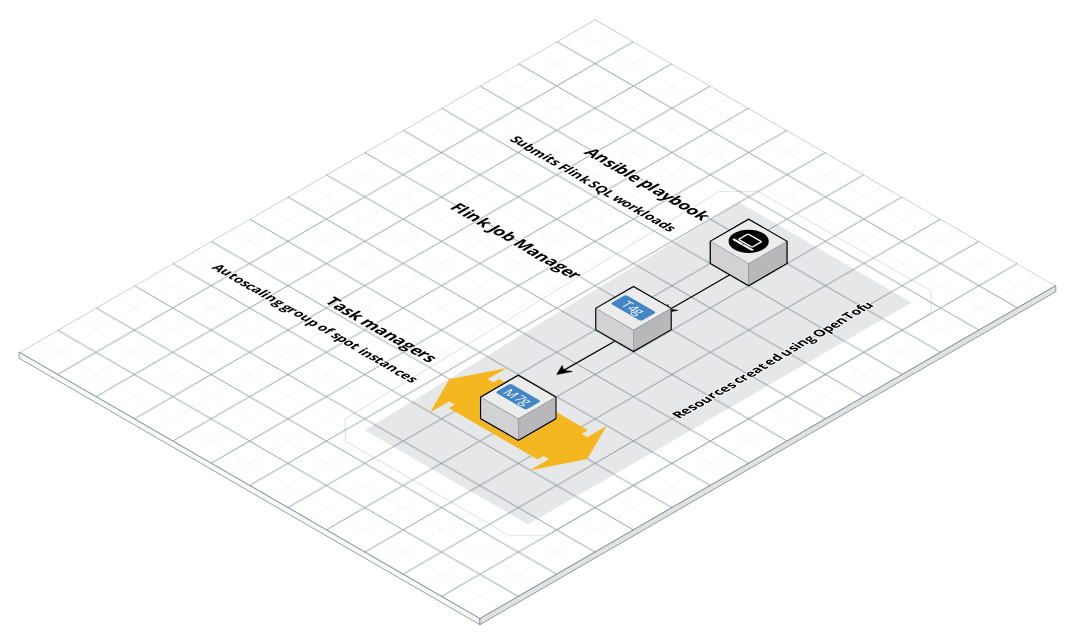
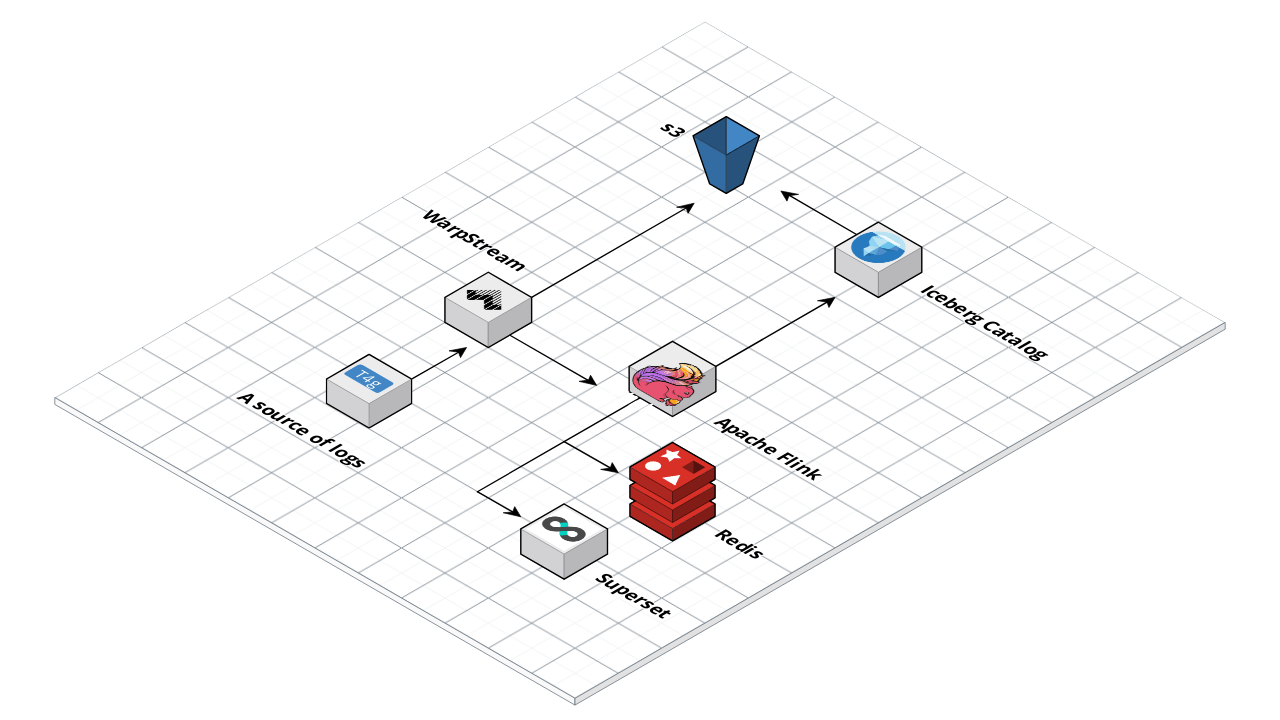
The following diagram shows the end result. Logs coming from a source to WarpStream. WarpStream stores data to s3. Flink reads the data from WarpStream and allows you to run queries on the data and snd the data back to s3 in a format suitable for long time storage and querying.
First, create a Warpstream account at https://warpstream.com and create your first virtual cluster. Take note of the cluster ID and create an API key
Install the Warpstream agent using the steps here https://docs.warpstream.com/warpstream/install-the-warpstream-agent
Once installed use the following command to start the virtual cluster:
warpstream agent -agentPoolName apn_[YOUR CLUSTER] -bucketURL s3://[YOUR S3 BUCKET] -apiKey aks_[YOUR API KEY] -defaultVirtualClusterID vci_[YOUR CLUSTER ID] -httpPort 8090
Vector.dev is quick to install and use. There is a handy quick start guide on their site https://vector.dev/docs/setup/quickstart/
Next, add a config file to tell vector to generate some sample logs for us to use, and send those logs to WarpStream
#/etc/vector/vector.toml
data_dir = "/var/lib/vector"
[api]
enabled = true
[sinks.my_sink_id.encoding]
codec = "json"
[sources.my_source_id]
type = "demo_logs"
count = 1000000
format = "json"
interval = 1
lines = [ "line1" ]
[transforms.parse_apache_logs]
type = "remap"
inputs = ["my_source_id"]
source = '''
parsed_json = parse_json!(.message)
.host = parsed_json.host
.user_identifier = parsed_json."user-identifier"
.datetime = parsed_json.datetime
.method = parsed_json.method
.request = parsed_json.request
.protocol = parsed_json.protocol
.status = parsed_json.status
.bytes = parsed_json.bytes
.referer = parsed_json.referer
'''
[sinks.my_sink_id]
type = "kafka"
inputs = [ "my_source_id" ]
bootstrap_servers = "localhost:9092"
topic = "logs"
This config consists of a source which generates sample data and a sink which is our warpstream virtual cluster.
The transform block is extracting the fields we need like host, identifier, date and so on from a nested message json.
The bootstrap_servers variable points to localhost:9092 which is the endpoint of your WarpStream agent running locally.
You can start vector with your config file using:
vector -c /etc/vector/vector.toml
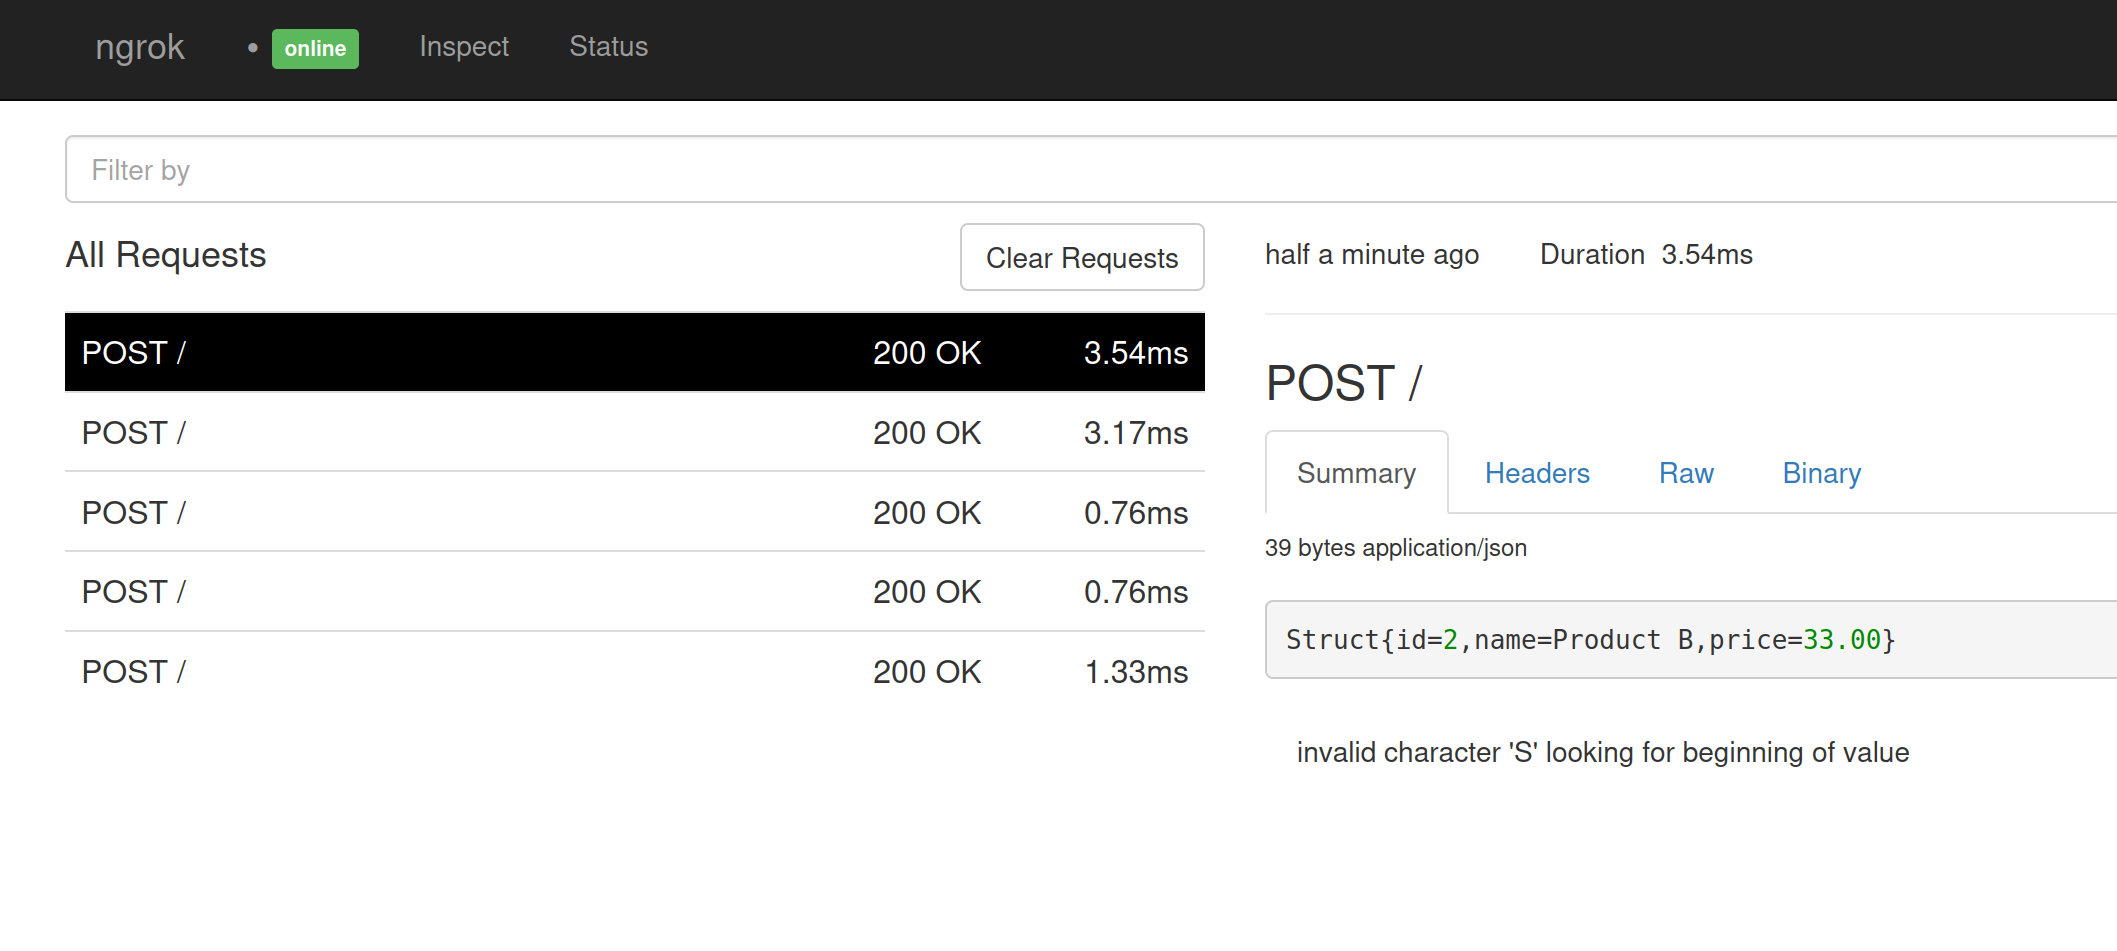
With vector and warpstream running, you should be receiving some data in to your s3 bucket.
If you have the AWS CLI installed, you could view the content of your s3 bucket using the following command to see if there is any new data in your bucket
aws s3 ls s3://my-test-bucket/
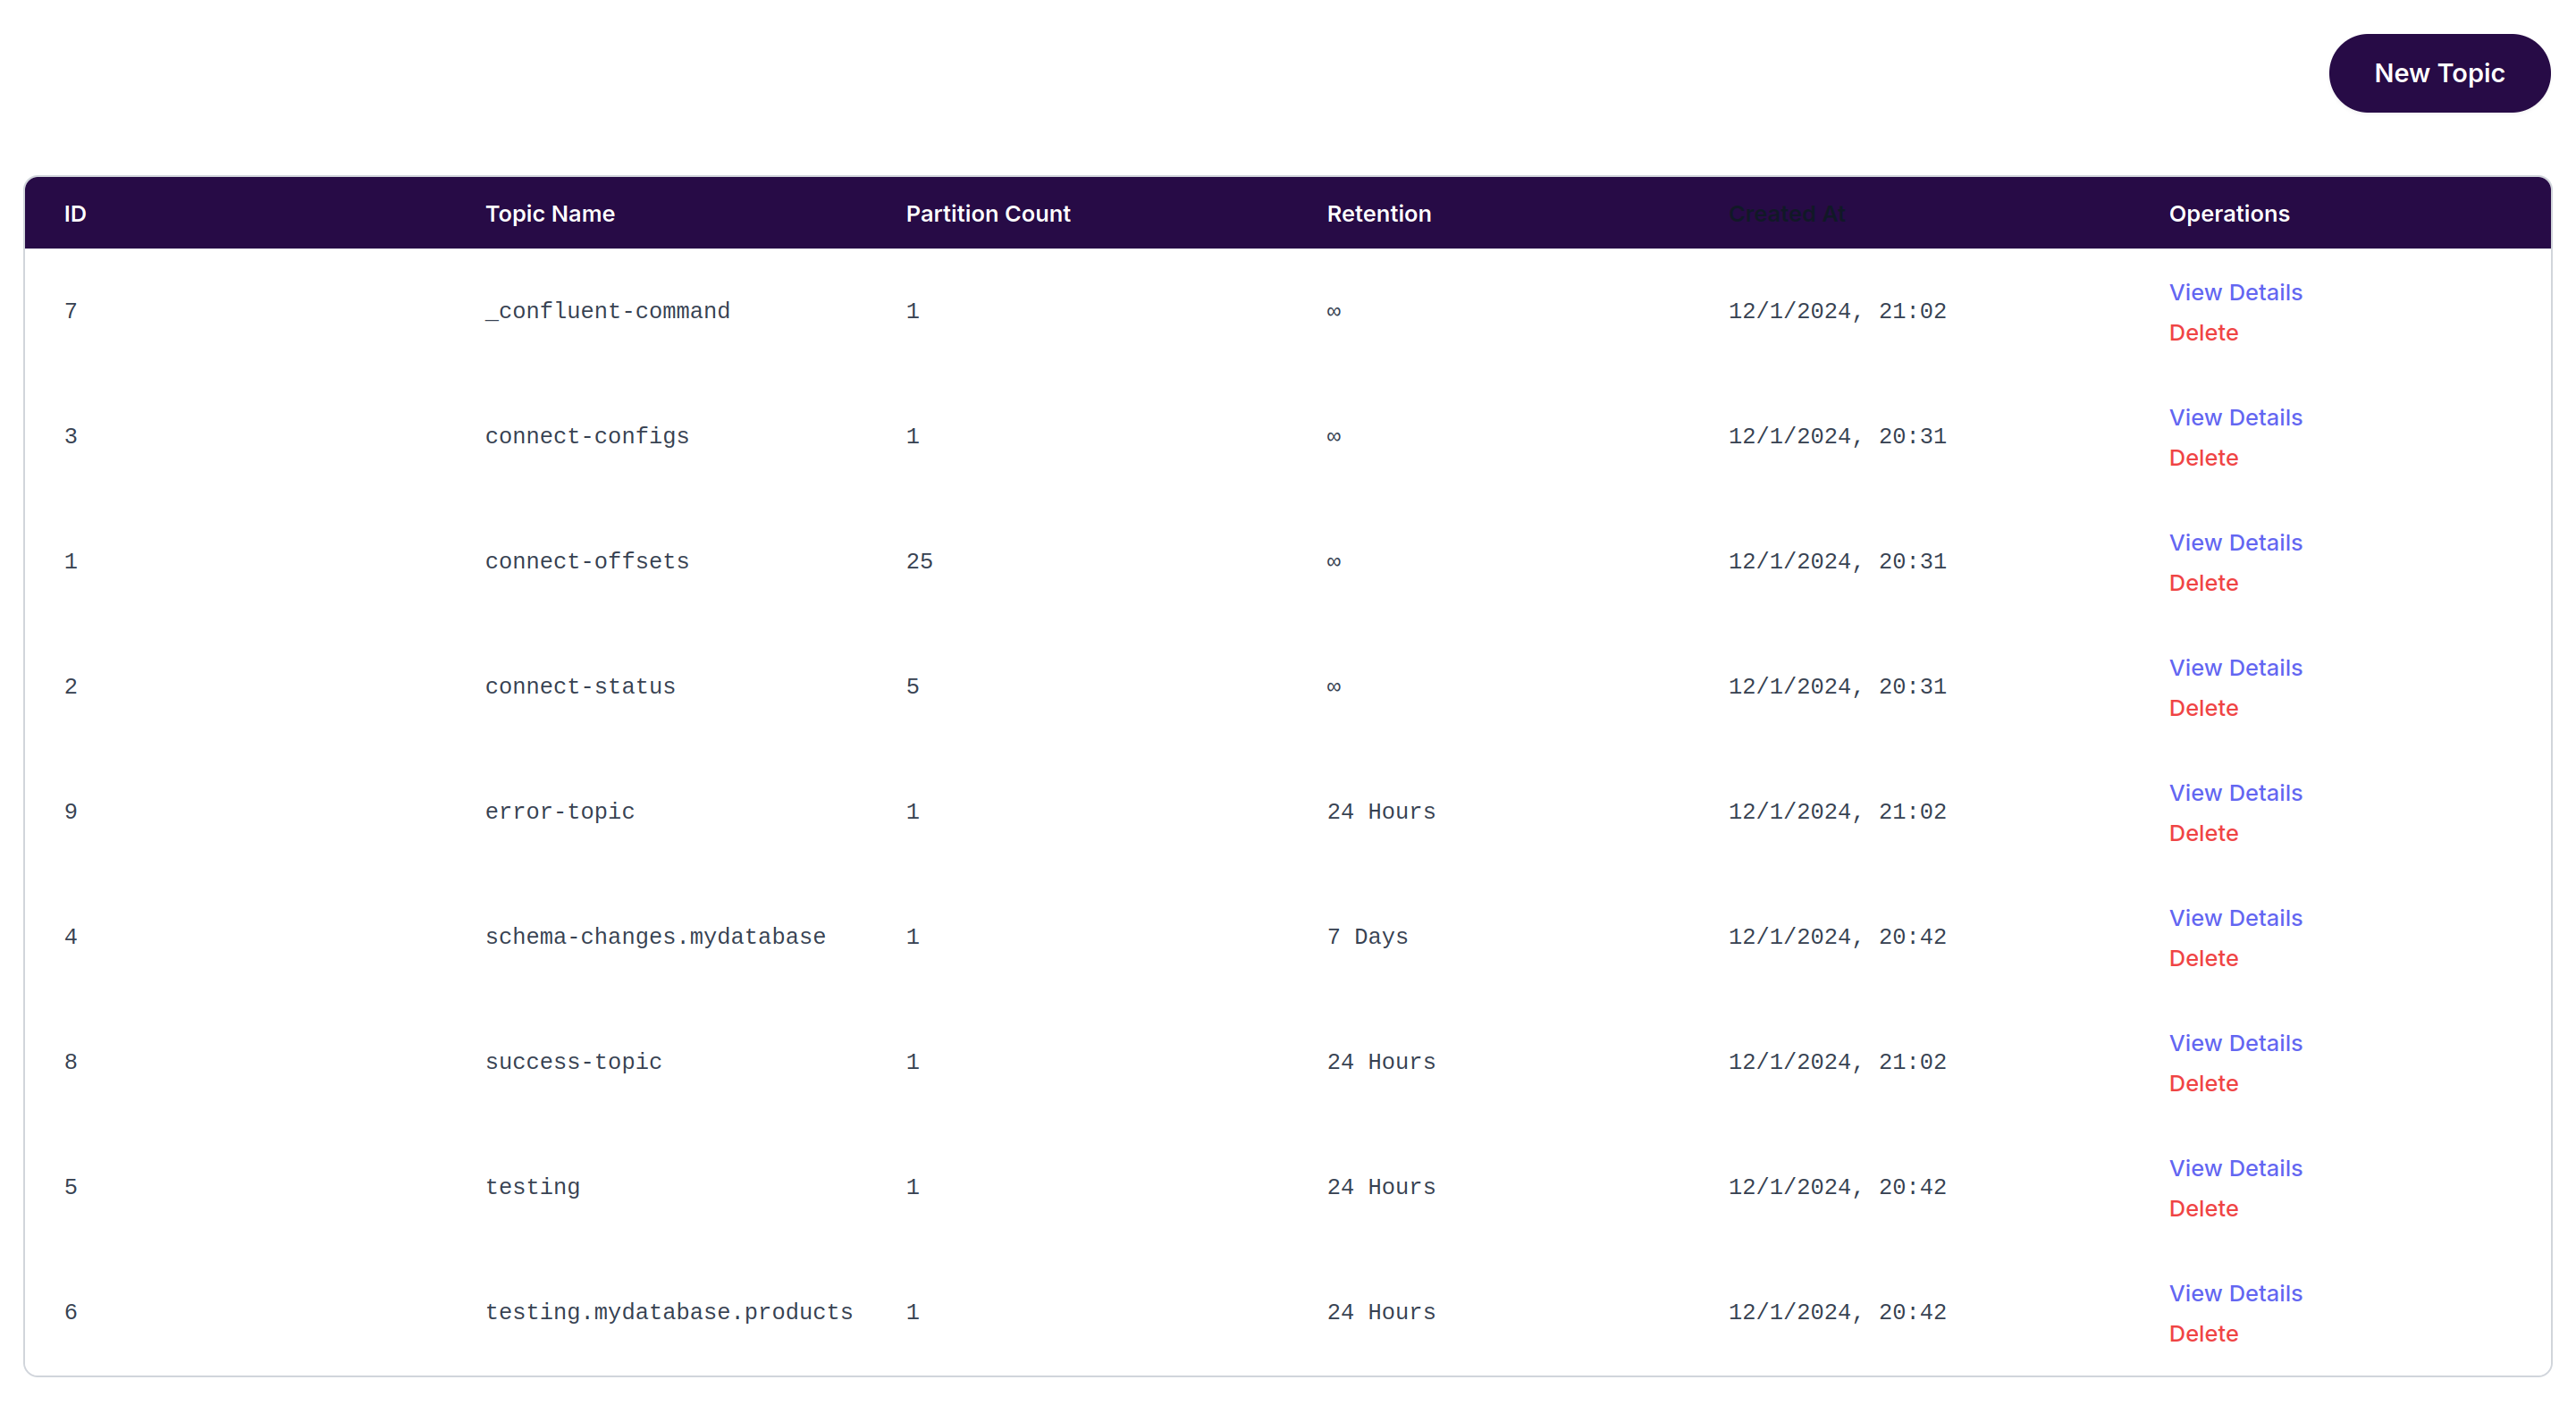
Or if you have the kafka cli, you could list the topics and get some messages
# list topics in the cluster
./bin/kafka-topics.sh --bootstrap-server localhost:9092 --list
# list messages in a topic called logs
./bin/kafka-console-consumer.sh --topic logs --from-beginning --bootstrap-server localost:9092
You can start a Flink cluster using Docker compose from this repo https://github.com/gordonmurray/apache_flink_and_warpstream_for_logs
Now we can get to the fun part of querying the log data using Flink. First we can create a table to hold the logs and perform some quick queries
Connect to the Flink SQL console using:
./bin/sql-client.sh
And create a table to hold the logs. Make sure to add your Magic URL to the bootstrap.servers
field.
CREATE TABLE apache_logs (
`bytes` INT,
`datetime` STRING,
`host` STRING,
`message` STRING,
`method` STRING,
`protocol` STRING,
`referer` STRING,
`request` STRING,
`service` STRING,
`source_type` STRING,
`status` STRING,
`mytimestamp` TIMESTAMP(3) METADATA FROM 'timestamp', -- assuming timestamp is in standard format
`user_identifier` STRING,
WATERMARK FOR mytimestamp AS mytimestamp - INTERVAL '5' SECONDS
) WITH (
'connector' = 'kafka',
'topic' = 'logs',
'properties.bootstrap.servers' = 'api-xxxxxxxxxxxxxxxxxx.warpstream.com:9092',
'properties.group.id' = 'flink',
'scan.startup.mode' = 'earliest-offset',
'format' = 'json',
'json.fail-on-missing-field' = 'false',
'json.ignore-parse-errors' = 'true'
);
Once the table is created you can query it like a regular table in a relational database
select * from apache_logs;
We can use Flink to keep an eye on our logs for some key patterns such as
An example query in flink to spot the same ip address with varying user agents as an example:
SELECT
host AS ip,
COUNT(DISTINCT user_identifier) AS user_identifier_count,
TUMBLE_START(mytimestamp, INTERVAL '1' MINUTE) as window_start,
TUMBLE_END(mytimestamp, INTERVAL '1' MINUTE) as window_end
FROM apache_logs
GROUP BY
host,
TUMBLE(mytimestamp, INTERVAL '1' MINUTE)
HAVING
COUNT(DISTINCT user_identifier) > 2;
heres some sample output from a query like this if it found some results that needed attention
| ip | user_identifier_count | window_start | window_end |
|-------------|-----------------------|---------------------|---------------------|
| 192.168.1.1 | 3 | 2023-11-18 10:00:00 | 2023-11-18 10:01:00 |
| 172.16.0.2 | 4 | 2023-11-18 10:01:00 | 2023-11-18 10:02:00 |
| 10.0.0.3 | 5 | 2023-11-18 10:02:00 | 2023-11-18 10:03:00 |
| 192.168.1.1 | 3 | 2023-11-18 10:03:00 | 2023-11-18 10:04:00 |
| 10.0.0.3 | 6 | 2023-11-18 10:04:00 | 2023-11-18 10:05:00 |
In this table:
ip
is the IP address of the host.user_identifier_count
is the count of distinct user identifiers accessing the host in that time window.window_start
and window_end
define the one-minute interval over which this aggregation is calculated.This output suggests that between 10:00 and 10:01, the host at IP 192.168.1.1 was accessed by 3 distinct user identifiers. The fact that these counts are greater than 2 (as per the HAVING
clause) indicates a relatively high level of activity or possibly different user agents interacting with the same host within that minute, which might be an interesting pattern to investigate further. Or it could just be members of a family accessing a popular web site.
While its great to query the logs here, the table disappears once you close the Flink console.
By default, Kafka or in this case WarpStream won’t store the log data long term either by design. You can set up infinite retention in Kafka, though that will add up in disk space cost when using kafka nodes.
Flink can help out here too. It can read the data from the logs topic and save it to s3 using a table format from Apache Iceberg. Apache Iceberg is “is a high-performance format for huge analytic tables. Iceberg brings the reliability and simplicity of SQL tables to big data”.
WarpStream will hold the newest logs as they come in and Flink can copy that data to s3 in a format that is efficient and available to query at any time for any historic queries you might like to run.
In Flink you can create a new Catalog which facilitates the storage to s3 for you.
Then you can create a table in the catalog and send data to it.
Heres the full Job for flink to read the data and send it to s3
USE CATALOG default_catalog;
CREATE CATALOG iceberg_catalog WITH (
'type' = 'iceberg',
'catalog-type' = 'hadoop',
'warehouse' = 's3a://my-test-bucket-gordon/iceberg',
's3a.access-key' = 'xxxxx',
's3a.secret-key' = 'xxxxx',
'property-version' = '1'
);
USE CATALOG iceberg_catalog;
CREATE DATABASE IF NOT EXISTS logs_database;
USE logs_database;
create temporary table apache_logs (
`bytes` INT,
`datetime` STRING,
`host` STRING,
`message` STRING,
`method` STRING,
`protocol` STRING,
`referer` STRING,
`request` STRING,
`service` STRING,
`source_type` STRING,
`status` STRING,
`mytimestamp` TIMESTAMP(3) METADATA FROM 'timestamp', -- assuming timestamp is in standard format
`user_identifier` STRING,
WATERMARK FOR mytimestamp AS mytimestamp - INTERVAL '5' SECONDS
) WITH (
'connector' = 'kafka',
'topic' = 'logs',
'properties.bootstrap.servers' = 'api-xxxxxxxxxxxxxxxxxx.warpstream.com:9092',
'properties.group.id' = 'flink',
'scan.startup.mode' = 'earliest-offset',
'format' = 'json',
'json.fail-on-missing-field' = 'false',
'json.ignore-parse-errors' = 'true'
);
CREATE TABLE IF NOT EXISTS apache_logs_archive (
`bytes` INT,
`datetime` STRING,
`host` STRING,
`message` STRING,
`method` STRING,
`protocol` STRING,
`referer` STRING,
`request` STRING,
`service` STRING,
`source_type` STRING,
`status` STRING,
`mytimestamp` TIMESTAMP(3) METADATA FROM 'timestamp', -- assuming timestamp is in standard format
`user_identifier` STRING,
) WITH (
'format-version'='1'
);
SET 'execution.checkpointing.interval' = '60 s';
INSERT INTO apache_logs_archive (bytes, datetime, host, method, protocol,referrer, request, service) SELECT bytes, datetime, host, method, protocol,referrer, request, service FROM apache_logs;
You now have some (sample) data logging to WarpStream and s3. Flink is then pulling in the data and storing it for long term storage in Iceberg format on s3 with Flink ready to work on your data to spot patterns such as errors or malicious use and send it wherever you need.
Apache Superset can add the final step, a “data exploration and data visualization able to handle data at petabyte scale.”
Using Flinks SQL Gateway and JDBC connector, Superset can read from Flink but thats a post for another day!
The code snippets used here are available on Github at https://github.com/gordonmurray/apache_flink_and_warpstream_for_logs
]]>While running Flink in containers, we’ll need to use cAdvisor to gather the metrics from the containers so that Prometheus can scrape them.
One quick note; if you are running docker compose on an AWS EC2 instance, the cAdvisor container won’t work on ARM based instances like the t4g or r6gs as it doesn’t have a build for ARM based instances that I have found.
We can add cAdvisor to the docker compose file using the following block. It will run a container called cadvisor that will collect the metrics from the running flink containers. When its running, cAdvisor has a UI at htp://localhost:8080 and the metrics can be scraped from http://localhost:8080/metrics
Add the following to your docker-compose.yml file:
cadvisor:
image: gcr.io/cadvisor/cadvisor
container_name: cadvisor
ports:
- "8080:8080"
volumes:
- /:/rootfs:ro
- /var/run:/var/run:rw
- /sys:/sys:ro
- /var/lib/docker/:/var/lib/docker:ro
In our Flink containers, we need to add some environment variables to enable the prometheus metrics:
metrics.reporters: prom
metrics.reporter.prom.factory.class: org.apache.flink.metrics.prometheus.PrometheusReporterFactory
metrics.reporter.prom.port: 9091
To run the containers use the following command. If you are running docker compose for the first time, it may take a minute to download the images and run them.
docker compose up -d
Once the containers are up and running you can see a list of them using:
docker ps
To confirm that each container is exposing its prometheus metrics, you can connect to each container and curl localhost:9091 as follows
# first connect to a task manager
docker exec -it apache_flink_and_docker_compose-taskmanager-1 /bin/bash
# then curl the metrics
root@1aa3fb3bd007:/opt/flink# curl localhost:9091
you should see a longish output similar to the following:
# HELP flink_taskmanager_Status_JVM_Memory_NonHeap_Used Used (scope: taskmanager_Status_JVM_Memory_NonHeap)
# TYPE flink_taskmanager_Status_JVM_Memory_NonHeap_Used gauge
flink_taskmanager_Status_JVM_Memory_NonHeap_Used{host="172_18_0_7",tm_id="172_18_0_7:38235_53686e",} 5.5132808E7
# HELP flink_taskmanager_Status_JVM_CPU_Load Load (scope: taskmanager_Status_JVM_CPU)
# TYPE flink_taskmanager_Status_JVM_CPU_Load gauge
flink_taskmanager_Status_JVM_CPU_Load{host="172_18_0_7",tm_id="172_18_0_7:38235_53686e",} 0.0
# HELP flink_taskmanager_Status_JVM_GarbageCollector_G1_Old_Generation_Time Time (scope: taskmanager_Status_JVM_GarbageCollector_G1_Old_Generation)
# TYPE flink_taskmanager_Status_JVM_GarbageCollector_G1_Old_Generation_Time gauge
Assuming you have prometheus running on another server, you won’t be able to get Prometheus to connect to each container running on a remote server. This is where cAdvisor comes in. It can get the metrics from each container and expose them so that Prometheus can scrape them remotely.
Assuming your cAdvisor container is running, you can curl localhost on port 8080/metrics to see the combined metrics from the running containers:
curl localhost:8080/metrics
You should see a similar but longer version of the list of metrics from when you curled the metrics from inside a container.
A guide on how to set up Prometheus would need a blog post in itself. However if you have Prometheus already running, in your Prometheus config file, you’ll need to add a job to let prometheus know about our flink instances so it can poll the metrics to power a grafana dashboard or any alerts. You’ll need to add a block like this one, pointing to the IP address of your flink server:
- job_name: 'flink_instance'
static_configs:
- targets: ['100.xxx.xxx.xxx:8080']
Or, if you are using service discovery in Prometheus you can use the following job to look for ec2 instances using a particular Tag and value instead:
- job_name: 'flink-job-managers'
ec2_sd_configs:
- region: 'us-east-1'
profile: 'MY-IAM-PROFILE'
port: 8080
filters:
- name: tag:Name
values:
- 'Flink Job Manager'
relabel_configs:
Some of the metrics Id recommend monitoring to help debug flink jobs are below. You won’t see these metric names show up until you have some jobs running first in Flink.
The following image is a visualisation of the flink_taskmanager_job_task_backPressuredTimeMsPerSecond metric showing a new job thats busy for a few minutes.
The changes mentioned here to enable the metrics have been added to a docker compose file here in an earlier project that shows how to perform some basic CDC from ariadb to Redis using Flink:
https://github.com/gordonmurray/apache_flink_and_docker_compose
]]>Paimon was straight forward to get up and running within Flink and it stored data in s3 in ORC format. ORC is not a format I’ve worked with before so I wasn’t too excited by it and unfortunately I didn’t see a option to change the format.
After trying Paimon, I was reminded of Apache Iceberg. Paimon is still in the Incubating stage at Apache and Iceberg graduated from the Incubator in 2020 so Iceberg might have been a more mature solution for me to try out first.
Having tried Iceberg, the data that it produces in an s3 bucket after CDCing from a test database seems more usable to me compared to the ORC Files produced by Paimon. The data is stored in parquet format and its snapshots are stored in Avro format, which I have some experience with. It has added metadata files too in json format.
The folder structure it creates on s3 is below. Its a folder structure with the name of the database and a folder per table. Inside each “table” is a data folder with the parquet files and a “metadata” folder with snapshots in avro format.
my-test-bucket/iceberg/
└── my_database
└── my_products
├── data
│ └── 00000-0-97c48300-6a94-485e-ae0d-d103aec5731f-00001.parquet
└── metadata
├── 8bf311cc-aa78-4fe3-b6ce-c8c1191c9591-m0.avro
├── snap-818359114004327704-1-681279e0-1f89-428e-8ca4-350082edd535.avro
├── v22.metadata.json
└── version-hint.text
I was able to insert more records in to the test database and Flink picked up on the changes. The new records added to the Iceberg data in s3 without issue.
When I altered the table to add a new column however I didn’t see that reflected in the data in s3. The newer metadata files created after adding a column still show a structure with the 3 original fields in it and not 4 as expected. So theres more to learn there.
Even though Im working with only a dozen records or so for testing, the Sink task in the Flink job continued to be busy after sending all the data, which is a bit concerning for such as small number of records. Though it could be the checkpointing as I had that set to checkpoint everey 10 seconds which is a bit much and adds a bit of overhead to its workload as far as I know.
With the data now in s3, I was able to start a new Flink job and query the existing data which is great. Overall, using Iceberg could be a great option for long term storage of data on s3 in a structured format that Flink or other tools like Apache Drill can readily query when needed.
The source to replicate this is on Github at https://github.com/gordonmurray/apache_flink_and_iceberg. The main part to get this running was the SQL command in Flink to create a catalog, nearly identical to the process for Paimon too.
CREATE CATALOG s3_catalog WITH (
'type' = 'iceberg',
'catalog-type' = 'hadoop',
'warehouse' = 's3a://my-test-bucket-gordon/iceberg',
's3a.access-key' = 'xxxxxx',
's3a.secret-key' = 'xxxxx',
'property-version' = '1'
);
After creating a database, a table and sending some data to the table. I was able to start another Flink Job, define the catalog again and query the data on s3 just like I would in a relational database:
use catalog s3_catalog;
use my_database;
select * from my_products;
So all I have to do now if figure out how Iceberg handles schema changes!
]]>There are a number of options available to send data from Flink to other storage locations, such as sinking to a relational database or to s3. While I was reading about Flink Catalogs after some recent Catalog use, I found out about Apache Paimon.
Streaming data lake platform with high-speed data ingestion, changelog tracking and efficient real-time analytics.
In its Getting Started section, it had a guide to working with Flink, so I tried it out.
I used docker compose to get Flink up and running. I added a database to stream some data and added the Paimon and S3 JARs.
The docker compose file is:
version: '3.7'
services:
mariadb:
image: mariadb:10.6.14
environment:
MYSQL_ROOT_PASSWORD: rootpassword
volumes:
- ./sql/mariadb.cnf:/etc/mysql/mariadb.conf.d/mariadb.cnf
- ./sql/init.sql:/docker-entrypoint-initdb.d/init.sql
ports:
- "3306:3306"
jobmanager:
image: flink:1.17.1
container_name: jobmanager
environment:
- JOB_MANAGER_RPC_ADDRESS=jobmanager
ports:
- "8081:8081"
command: jobmanager
volumes:
- ./jars/flink-sql-connector-mysql-cdc-2.4.1.jar:/opt/flink/lib/flink-sql-connector-mysql-cdc-2.4.1.jar
- ./jars/flink-connector-jdbc-3.1.0-1.17.jar:/opt/flink/lib/flink-connector-jdbc-3.1.0-1.17.jar
- ./jars/paimon-flink-1.17-0.6-20231030.002108-52.jar:/opt/flink/lib/paimon-flink-1.17-0.6-20231030.002108-52.jar
- ./jars/flink-shaded-hadoop-2-uber-2.8.3-10.0.jar:/opt/flink/lib/flink-shaded-hadoop-2-uber-2.8.3-10.0.jar
- ./jars/flink-s3-fs-hadoop-1.17.1.jar:/opt/flink/plugins/s3-fs-hadoop/flink-s3-fs-hadoop-1.17.1.jar
- ./jars/paimon-s3-0.6-20231030.002108-57.jar:/opt/flink/lib/paimon-s3-0.6-20231030.002108-57.jar
- ./jobs/job.sql:/opt/flink/job.sql
deploy:
replicas: 1
taskmanager:
image: flink:1.17.1
environment:
- JOB_MANAGER_RPC_ADDRESS=jobmanager
depends_on:
- jobmanager
command: taskmanager
volumes:
- ./jars/flink-sql-connector-mysql-cdc-2.4.1.jar:/opt/flink/lib/flink-sql-connector-mysql-cdc-2.4.1.jar
- ./jars/flink-connector-jdbc-3.1.0-1.17.jar:/opt/flink/lib/flink-connector-jdbc-3.1.0-1.17.jar
- ./jars/paimon-flink-1.17-0.6-20231030.002108-52.jar:/opt/flink/lib/paimon-flink-1.17-0.6-20231030.002108-52.jar
- ./jars/flink-shaded-hadoop-2-uber-2.8.3-10.0.jar:/opt/flink/lib/flink-shaded-hadoop-2-uber-2.8.3-10.0.jar
- ./jars/flink-s3-fs-hadoop-1.17.1.jar:/opt/flink/plugins/s3-fs-hadoop/flink-s3-fs-hadoop-1.17.1.jar
- ./jars/paimon-s3-0.6-20231030.002108-57.jar:/opt/flink/lib/paimon-s3-0.6-20231030.002108-57.jar
deploy:
replicas: 2
I started the mini Flink cluster using:
docker compose up -d
With the cluster running, I added some SQL commands to try out Paimon via a Catalog.
I created the following SQL to CDC from the database and send it to a table in Paimon.
USE CATALOG default_catalog;
CREATE CATALOG s3_catalog WITH (
'type' = 'paimon',
'warehouse' = 's3://my-test-bucket/paimon',
's3.access-key' = '',
's3.secret-key' = ''
);
USE CATALOG s3_catalog;
CREATE DATABASE my_database;
USE my_database;
CREATE TABLE myproducts (
id INT PRIMARY KEY NOT ENFORCED,
name VARCHAR,
price DECIMAL(10, 2)
);
create temporary table products (
id INT,
name VARCHAR,
price DECIMAL(10, 2),
PRIMARY KEY (id) NOT ENFORCED
) WITH (
'connector' = 'mysql-cdc',
'connection.pool.size' = '10',
'hostname' = 'mariadb',
'port' = '3306',
'username' = 'root',
'password' = 'rootpassword',
'database-name' = 'mydatabase',
'table-name' = 'products'
);
SET 'execution.checkpointing.interval' = '10 s';
INSERT INTO myproducts (id,name) SELECT id, name FROM products;
The SQL creates a catalog called “s3_catalog” and inside it creates a database “my_database” and a table “myproducts”.
Using Paimon was as easy as creating the catalog with suitable s3 credentials and then creating and querying tables as normal to populate data in s3:
CREATE CATALOG s3_catalog WITH (
'type' = 'paimon',
'warehouse' = 's3://my-test-bucket/paimon',
's3.access-key' = '',
's3.secret-key' = ''
);
I submitted the job to Flink:
docker exec -it jobmanager /opt/flink/bin/sql-client.sh embedded -f job.sql
With the Job up and running, I checked on s3 using the AWS CLI to list the contents of my s3 test bucket:
aws s3 ls my-test-bucket/paimon/my_database.db/myproducts/
The job had created the following folders in the bucket:
PRE bucket-0/
PRE manifest/
PRE schema/
PRE snapshot
The schema it stored for the products table on s3 was in JSON format:
{
"id" : 0,
"fields" : [ {
"id" : 0,
"name" : "id",
"type" : "INT NOT NULL"
}, {
"id" : 1,
"name" : "name",
"type" : "STRING"
}, {
"id" : 2,
"name" : "price",
"type" : "DECIMAL(10, 2)"
} ],
"highestFieldId" : 2,
"partitionKeys" : [ ],
"primaryKeys" : [ "id" ],
"options" : { },
"timeMillis" : 1696694538055
}
And in a folder called bucket-0
there was the data from my test database, in ORC format which stands for Optimized Row Columnar.
2023-11-05 21:11:27 1279 data-19c71b4d-91c2-45fa-b9f2-b7403e2269e4-0.orc
2023-11-05 20:46:56 1279 data-dec5ca81-ad69-4619-9180-99267f6c60f5-0.orc
ORC is comparable to the Parquet file format and AWS have a quick comparison here on their respective strengths: https://docs.aws.amazon.com/athena/latest/ug/columnar-storage.html
In the end it was quick and easy to get Paimon running to help Flink send data to s3 in a structured format.
However when I first tried this a few days ago I didn’t save my data and when I went back to try it again, I couldn’t for the life of me get it to write data to s3 again.
After trying different Jars for Paimon and s3, I even submitted an issue to the Paimon Github repo. Only to close it a few minutes later after I re-read the docs and found the all important line, with a comment showing how important it is:
Once I added that, data was writing to the s3 bucket again.
All I need to do now it to make sure I can read the ORC data using Flink. Hopefully Flink can pull long term data back in from s3 quickly and easily for longer term type queries rather than keeping it all in Kafka.
The files used for this are on Github at https://github.com/gordonmurray/apache_flink_and_paimon
]]>You can start out using a docker compose file, then upload and run an SQL file that contains the jobs you want to run.
This approach of running workloads on Flink is using Flink SQL, it’s one of several ways to run workloads. Writing Java apps, compiling them as Jar files and uploading them to run is probably the more common way to run workloads.
Here is a minimal docker compose file to run a Flink job manager and 2 task managers
version: '3.7'
services:
jobmanager:
image: flink:1.17.1
environment:
- JOB_MANAGER_RPC_ADDRESS=jobmanager
ports:
- "8081:8081"
command: jobmanager
taskmanager:
image: flink:1.17.1
environment:
- JOB_MANAGER_RPC_ADDRESS=jobmanager
depends_on:
- jobmanager
command: taskmanager
deploy:
replicas: 2
Assuming docker compose is installed you can start the containers using the following command in the same folder as the docker compose file:
docker compose up -d
This will start the containers in the background and you can check that the containers are running using
docker ps
You should see something like the following showing a jobmanager and 2 task managers.
CONTAINER ID IMAGE COMMAND CREATED STATUS PORTS NAMES
eb87408560be flink:1.17.1 "/docker-entrypoint.…" 35 minutes ago Up 35 minutes 6123/tcp, 8081/tcp apache_flink_and_docker_compose-taskmanager-2
565fd52d250a flink:1.17.1 "/docker-entrypoint.…" 35 minutes ago Up 35 minutes 6123/tcp, 8081/tcp apache_flink_and_docker_compose-taskmanager-1
0b3e3eaa5c06 flink:1.17.1 "/docker-entrypoint.…" 35 minutes ago Up 35 minutes 6123/tcp, 0.0.0.0:8081->8081/tcp, :::8081->8081/tcp jobmanager
To start adding some work to Flink you can access the Flink console using the following command and from there you can try out various jobs like creating tables.
Use the docker-compose.yml file in this repo to create Flink, Mariadb and redis containers instead of the minimal example provided earlier.
docker exec -it jobmanager /opt/flink/bin/sql-client.sh
To get a feel for using Flink, create a table that will read data from a database table running in another container:
-- read in the data from the table in mariadb
CREATE TABLE sales_records_table (
sale_id INT,
product_id INT,
sale_date DATE,
sale_amount DECIMAL(10, 2),
PRIMARY KEY (sale_id) NOT ENFORCED
) WITH (
'connector' = 'mysql-cdc',
'hostname' = 'mariadb',
'port' = '3306',
'username' = 'root',
'password' = 'rootpassword',
'database-name' = 'sales_database',
'table-name' = 'sales_records'
);
The view the data using:
select * from sales_records_table;
If you want to take things up a notch, you can write your SQL commands to a file, then submit the file to Flink for it to run in the background.
The following file has a few commands to read from a fictional log of sales in a table in a source database, perform ongoing change data capture (CDC), perform a sum of all sales and then sink the resulting sales sum in to redis.
-- read in the data from the table in mariadb
CREATE TABLE sales_records_table (
sale_id INT,
product_id INT,
sale_date DATE,
sale_amount DECIMAL(10, 2),
PRIMARY KEY (sale_id) NOT ENFORCED
) WITH (
'connector' = 'mysql-cdc',
'hostname' = 'mariadb',
'port' = '3306',
'username' = 'root',
'password' = 'rootpassword',
'database-name' = 'sales_database',
'table-name' = 'sales_records'
);
-- create a view that aggregates the sales records
CREATE TEMPORARY VIEW total_sales AS
SELECT
SUM(sale_amount) AS total_sales_amount
FROM
sales_records_table;
-- create a redis sink table
CREATE TABLE redis_sink (
key_name STRING,
total DECIMAL(10, 2),
PRIMARY KEY (key_name) NOT ENFORCED
) WITH (
'connector' = 'redis',
'redis-mode' = 'single',
'host' = 'redis',
'port' = '6379',
'database' = '0',
'command' = 'SET'
);
-- insert the aggregated sales records into the redis sink table
INSERT INTO
redis_sink
SELECT
'total_sales',
total_sales_amount
FROM
total_sales;
This job.sql will already be available in the container ready to run it:
docker exec -it jobmanager /opt/flink/bin/sql-client.sh embedded -f job.sql
While this is a made up example its a good example of what Flink can do on its own.
Once the Job is running, check the Flink UI and you’ll see your running Job by going to http://localhost:8081/#/overview
You can check redis to see if the value is in there:
redis-cli -h localhost
get total_sales
# "5500.00"
You can expand on this by adding Checkpoints, which can be handy to help Flink jobs tolerate restarts. I wrote about checkpoints recently here: https://gordonmurray.com/data/2023/10/25/using-checkpoints-in-apache-flink-jobs.html
Once you’re done, you can run docker compose down
to stop the containers.
insert-into_default_catalog.default_database.sink_name
. If you’re pulling records from multiple sources and sinking them to the same place such as a Redis cache it can be hard to tell which one is which if a job needs some attention. As far as I can tell you can only provide names when submitting jobs via Java.
I was looking in to Catalogs to see what they could do. I wanted to store CDC data somewhere to avoid re-snaphotting data from source databases, or to share data between jobs. When I created a couple of new jobs using a Catalog I noticed the jobs had different naming.
The Jobs now have a Catalog name and a database name that helps tell them apart.
I know this isn’t a proper use of Catalogs in Flink. Catalogs can do more than just helping with the naming of jobs though for me it’s definitely effective to label dozens of jobs sinking to a central place.
I used the following to create a Catalog and a database and use them when creating any tables in a Job. Its an in-memory Catalog and it doesn’t help with my initial hope of storing the CDC data to avoid performing snapshots, though it gives me some useful naming at a glance.
Theres a Docker Compose file and related files in Github here to try this out : https://github.com/gordonmurray/apache_flink_catalog_misuse
USE CATALOG default_catalog;
CREATE CATALOG myproject WITH ('type'='generic_in_memory');
USE CATALOG myproject;
CREATE DATABASE mydatabase;
USE mydatabase;
CREATE TABLE []..]
I’ve been using Flink with Kafka since to help take the pressure off the databases which works well.
For a proper use of Catalogs, I tried out Apache Paimon briefly for storing data on S3 in ORC format and plan to revisit it again soon. Theres definitely more to learn about Catalogs.
]]>